Showing posts with label Custom Blog Design Tutorial. Show all posts

1.13.2011

Make a Simple Rotating Header in Photoshop

In this tutorial, I am going to show you how to make a header like this one:  **it is the same concept as making a Blinky

It is great for Photography blog designs and just if you want to add a little something different, but it is MUCH easier than doing a flash header.  NOTE: You can only save this as a GIF file, so your quality will not be as high as a JPEG or PNG, so if you need something really high quality, this is not the best tutorial for you :)

1.03.2011

Make a Cute Blog Monday! One Super Cute Blog

I know, technically it is Tuesday, I am 18 Minutes late....  I meant to get it done on Monday :p

This is brand new, but I think I am going to steer away from Weeks, for the time being anyway, every Monday (or almost every monday), I am going to make a cute blog, and show you how I did it!

This weeks blog is "One Super Cute Blog" Click Here to see it live.


How to Get a Cute Non-Web Font for your Blog.


Part 1: Get Set up

How to change the Color of the Blogger Bar at the top of your Blog.

This is Super Easy!  Just go to your Dashboard, and Click on the Edit next to your Navbar.

There you have a bunch of options, and just click save when you are done.  That's it!

12.29.2010

Making a Custom Header using Picnik. SO EASY and FREE!

Step #1: Making the Header
I found this really cool website called Picnik it is so easy to use, and the best part is that it is FREE and NO registration required!!  I will show you how I made this header, so that you can make one that is 100% Custom for you!


First, head over to Picnik, and click on Get Started!

12.15.2010

EASY DIY Custom Blog Design Part 4: Header

This is a Series of Tutorials, so if you need to start at the beginning, CLICK HERE.
Step #1: Making the Header
I found this really cool website called Picnik it is so easy to use, and the best part is that it is FREE and NO registration required!!  I will show you how I made this header, so that you can make one that is 100% Custom for you!

First, head over to Picnik, and click on Get Started!

EASY DIY Custom Blog Design Part 3: Wide 2 Column Template

This is a Series of Tutorials, so if you need to start at the beginning, CLICK HERE.

In this part of the tutorial, I am going to show you how to make a wide 2 column template with nice white space.  If you want to make a 3 column template instead, I have a tutorial HERE.

This tutorial uses the Minima Template (if you started at the beginning, I already had you do this).

First, you will need to head over to your Edit HTML page and scroll down to #header-wrapper { and change 660px to 1000px (or change it to what ever width you would like, in my example I am doing 1000px).

Next do the same thing on your #outer-wrapper {

Now I need to adjust the #main-wrapper {  I changed my width to 640px.

Then adjust the  #sidebar-wrapper {  I changed mine to 300px.

If you like your sidebar on the right, you can stop here, but if you would like to change it to the left, I will show you how to do that now.

Go to your #main-wrapper {  and change $startSide to $endside, and go to your #sidebar-wrapper {  and change $endSide to $startSide.  Now it should look like this!

Now Save your Template, and you are set!

EASY DIY Custom Blog Design Part 2: Background

This is a Series of Tutorials, so if you need to start at the beginning, CLICK HERE.

You can find cute Free Blog Backgrounds all over the Net.

But I am thinking more custom than that, so I am going to show you how to make a Custom Seamless pattern to use for a background at Colourlovers.com   I love this website!  Below is the Pattern that I colored, and that I am going to use for my example.  **If you want to use a digital scrapbook paper instead of making one, I have a tutorial here.

So first, you need to set up a Free account.

EASY DIY Custom Blog Design Part 1: Getting Started

One of the biggest complaints/questions that I get about these tutorials, is that some people don't have Photoshop or they don't want to download any software and try to learn all of it to do a custom blog design.  So... I have been doing some serious searching and experimenting, and I am going to show you how to make a cute and completely CUSTOM Blog Design with NO software that you have to download!!

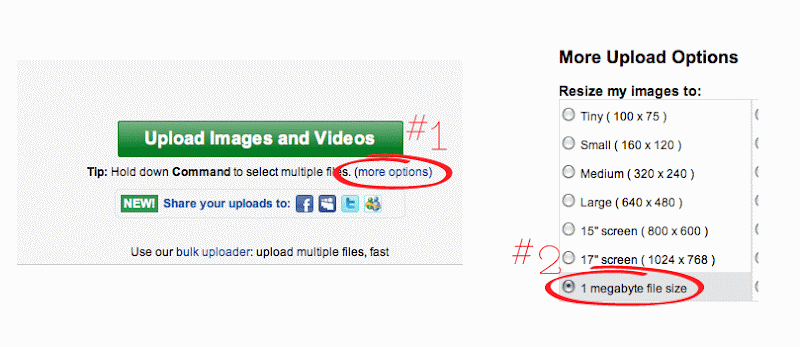
So the first thing that we need to do to get started is to set up a photobucket account. Go to Photobucket.com and set up the FREE account. Once that is set up, you need to make sure to click on "(more options)" see below, and select "1 megabyte file size"

Back in blogger, the very FIRST thing you need to do is to back up your template, to do that, go to "Edit HTML" and click on "Download Full Template". Take that file and make sure you know where it is so that if you need to go back you can.

We need to change our template to Minima, it is an older template, so you will need to go to your "Edit HTML" page, and click on "Select Layout Template", then you will see it :) When you click on "Save Template", it may or may not ask you if you wish to keep your widgets, if it does, keep them, unless you want to loose everything on your sidebars. 
That is all we need to do to get you started!


12.02.2010

The Easy Way to Make a Seamless Pattern in Adobe Illustrator and Install it in Blogger.

I used to make all of my blog backgrounds about 1600px X 1000px, which is all good....  but I hated it when I would look at my designs on my dad's 30in monitor and I would see all that nasty white space on the sides of my beautiful designs.

Hopefully with this simple tutorial, I can get you hooked on seamless patterns as backgrounds.  Not only are they simple to make, and oh so lovely, the go on forever and ever, no nasty white space.  Oh, and don't let me forget, they are smaller in file size, therefore, they will show up quicker when you are loading your page.

So on to the tutorial!  This is going to be the first of 2 tutorials, and this one is the UBER EASY way to do it.  We are going to take a dingbat font (this is "Davys" that I found at fontsquirrel.com) and make that into our seamless pattern.

11.30.2010

DIY Custom Blog Design Part 6: Custom Signature

This is Part 6 of a series of tutorials, if you need to start at the beginning, click here.

I have made my Custom Signature in Adobe Illustrator (Here is a Tutorial if you are interested), but if you don't have Illustrator, or you are just more of a Photoshop kinda girl (or guy).  That is fine too!  If you don't have either, you can use the free Paint.net, or My Live Signature.


I made my signature 175px Wide by 100px Tall, but remember this is custom :)  So once you have your signature made, upload it to your Photobucket account (Start at Part 1 if you need help there).

11.29.2010

Making a Post Signature in Adobe Illustrator

I wanted to start this week off with a simple tutorial, so we are making a Custom Signature.  The fun thing about this tutorial, is that I am going to show you how to alter your font and so that your Signature can be even more personalized than just a cute font alone.  I am using Illustrator CS5, but you can use any version that you have (nothing in this tutorial requires CS5).


First I am going to make a new document.  I am sizing mine at 100px high by 175px wide.

11.27.2010

DIY Custom Blog Design Part 5: Sidebar Titles

This is Part 5 of a series of tutorials, if you need to start at the beginning, click here.

 In this part of the tutorial, we will make sidebar titles and I will show you how to install them.


You are going to first make the Sidebar title the same way that you did the Header.  If you need to see that Tutorial, CLICK HERE.  The only thing that you need to do differently, is to make the size of your sidebar titles, with the same width as your sidebar. You can find the width in your Edit HTML page here:

11.22.2010

DIY Custom Blog Design Part 4: Header

This is Part 4 of a series of tutorials, if you need to start at the beginning, click here

In this part of the tutorial, we will make a simple header and I will show you how to install it properly.

I am making my header in Photoshop CS5.  If you don't have Photoshop, you can use Paint.net it is similar to Photoshop, and 100% FREE!

11.17.2010

DIY Custom Blog Design Part 3: 3 Column Template

This is Part 3 of a series of tutorials, if you need to start at the beginning, click here.

In this part, I will show you how to make a 3 column template for your Custom Blog Design.

11.05.2010

DIY Custom Blog Design Part 2: Background

This is Part 2 of a series of tutorials, if you need to start at the beginning, click here.

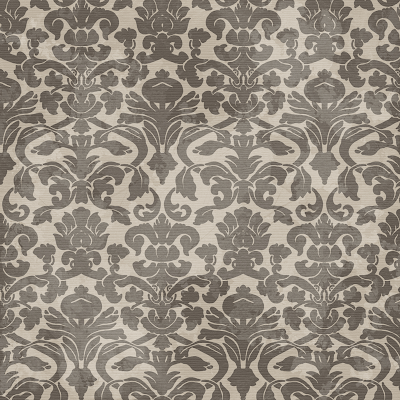
I have picked this paper from Amanda's Kit to use for my background:


So what I need to do first is open my paper up and size it down to 72dpi and somewhere between 1200 and 1800px (I totally just grabbed that number, just remember that this is custom, so size it where you want it :)

DIY Custom Blog Design Part 1: Getting Started

I am so excited to do this tutorial, it is something that I have thought about for a long time. I wanted to put together a completely custom blog design and show everyone that is ambitious enough how to do it themselves.

So there are TONS of ways to approach a custom blog design, so I just decided to pick one direction and go with it. I am going to take a digital scrapbooking kit and make a custom blog design from that.

Here is a quick list of places that I found to get free digital scrapbooking kits (NOTE: Make sure to check the owner's Terms of Use, many are NOT for Commercial Use, only Personal):


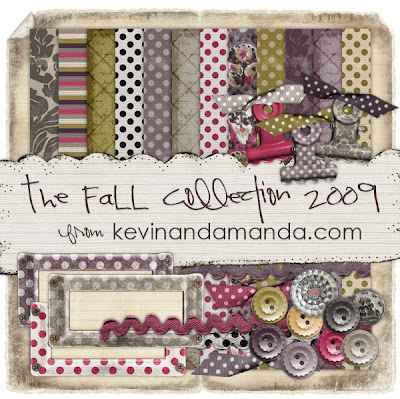
I chose to go with one of my favorite bloggers' kits, "The Fall Collection" at kevinandamanda.com! Check her out, because she has FREE fonts as well, and they are super cute!

So the first thing that we need to do to get started is to set up a photobucket account. Go to Photobucket.com and set up the FREE account. Once that is set up, you need to make sure to click on "(more options)" see below, and select "1 megabyte file size"

Back in blogger, the very FIRST thing you need to do is to back up your template, to do that, go to "Edit HTML" and click on "Download Full Template". Take that file and make sure you know where it is so that if you need to go back you can.

We need to change our template to Minima, it is an older template, so you will need to go to your "Edit HTML" page, and click on "Select Layout Template", then you will see it :) When you click on "Save Template", it may or may not ask you if you wish to keep your widgets, if it does, keep them, unless you want to loose everything on your sidebars.

Related Posts with Thumbnails