I wanted to start out WordPress week with a tutorial on how to set up a local server on your computer so that you can test out WordPress without having to spend any $$$ (I am sooo cheap :) on hosting, before you know if you like it or not.
Not only is MAMP fantastic for not spending money to test out WordPress, it is awesome if you are a designer and you want to work on designs without having make a "UNDER CONSTRUCTION" page or if you want to just test some things out.
Showing posts with label Advanced Tutorials. Show all posts
12.20.2010
12.15.2010
EASY DIY Custom Blog Design Part 1: Getting Started
One of the biggest complaints/questions that I get about these tutorials, is that some people don't have Photoshop or they don't want to download any software and try to learn all of it to do a custom blog design. So... I have been doing some serious searching and experimenting, and I am going to show you how to make a cute and completely CUSTOM Blog Design with NO software that you have to download!!

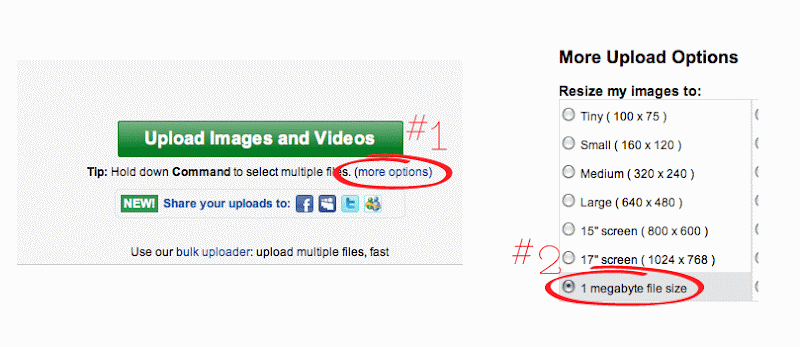
So the first thing that we need to do to get started is to set up a photobucket account. Go to Photobucket.com and set up the FREE account. Once that is set up, you need to make sure to click on "(more options)" see below, and select "1 megabyte file size"

Back in blogger, the very FIRST thing you need to do is to back up your template, to do that, go to "Edit HTML" and click on "Download Full Template". Take that file and make sure you know where it is so that if you need to go back you can.
We need to change our template to Minima, it is an older template, so you will need to go to your "Edit HTML" page, and click on "Select Layout Template", then you will see it :) When you click on "Save Template", it may or may not ask you if you wish to keep your widgets, if it does, keep them, unless you want to loose everything on your sidebars.
That is all we need to do to get you started!
12.02.2010
The Easy Way to Make a Seamless Pattern in Adobe Illustrator and Install it in Blogger.
I used to make all of my blog backgrounds about 1600px X 1000px, which is all good.... but I hated it when I would look at my designs on my dad's 30in monitor and I would see all that nasty white space on the sides of my beautiful designs.
Hopefully with this simple tutorial, I can get you hooked on seamless patterns as backgrounds. Not only are they simple to make, and oh so lovely, the go on forever and ever, no nasty white space. Oh, and don't let me forget, they are smaller in file size, therefore, they will show up quicker when you are loading your page.
So on to the tutorial! This is going to be the first of 2 tutorials, and this one is the UBER EASY way to do it. We are going to take a dingbat font (this is "Davys" that I found at fontsquirrel.com) and make that into our seamless pattern.
Hopefully with this simple tutorial, I can get you hooked on seamless patterns as backgrounds. Not only are they simple to make, and oh so lovely, the go on forever and ever, no nasty white space. Oh, and don't let me forget, they are smaller in file size, therefore, they will show up quicker when you are loading your page.
So on to the tutorial! This is going to be the first of 2 tutorials, and this one is the UBER EASY way to do it. We are going to take a dingbat font (this is "Davys" that I found at fontsquirrel.com) and make that into our seamless pattern.
11.29.2010
Making a Post Signature in Adobe Illustrator
I wanted to start this week off with a simple tutorial, so we are making a Custom Signature. The fun thing about this tutorial, is that I am going to show you how to alter your font and so that your Signature can be even more personalized than just a cute font alone. I am using Illustrator CS5, but you can use any version that you have (nothing in this tutorial requires CS5).
First I am going to make a new document. I am sizing mine at 100px high by 175px wide.
11.04.2010
Flash Header Tutorial (Flash Slides cross fading)
I am really excited about this tutorial, because only 3 months ago, I had never even used flash before and it is not as hard as you may think!
Step 1: Prepare your Slides
Subscribe to:
Posts (Atom)