


Not only is MAMP fantastic for not spending money to test out WordPress, it is awesome if you are a designer and you want to work on designs without having make a "UNDER CONSTRUCTION" page or if you want to just test some things out.
First off, MAMP is for Mac ONLY, so if you use Windows, I am not a ton of help (I don't even own a PC...). So if you have Windows, I found a tutorial HERE, that is similar to MAMP. If you are a MACaholic like me :) I will show you how do set everything up right here.
Step 1: Download WordPress
Go HERE to download WordPress, and click on the Download Link.

Now you need to unzip the file you just downloaded and rename the "wordpress" folder to what ever you want to name it (don't use spaces, so just do a one word name, or use _ s in it).

Step 2: Download MAMP
Here is the Link to the FREE MAMP Download.

After you have Downloaded and Installed MAMP, you need to take the WordPress folder that you have renamed, and move it into your MAMP htdocs folder shown below. (you can see that I have a few different sites in there that I am able to work on simultaneously!)

Step 3: Check your MAMP Preferences
Open your MAMP application (when you start it up, it will open a web page, that you need to leave open). When you open MAMP, you need to click on Preferences, then Apache. Your document root needs to say this: /Applications/MAMP/htdocs (if it doesn't already, change it) **if you want to save your websites in a different location, this needs to be changed to the location that you have your websites.

Step 4: Check that MAMP is running correctly
To make sure that MAMP is running properly, first, make sure that the Green lights are on. If they are red, click Start Servers. If it is working, it should look like this:

Now you need to go to: http://localhost:8888/ if you see your folder(s), then you are good up to this point!

Step 4: Setting Up Your WordPress Site
Now you need to go back to the webpage that I told you not to close earlier, if you did close it, or it didn't come up it is: http://localhost:8888/MAMP (MAMP must be capitalized)
Next you need to click on phpMyAdmin at the top of the page.

Now create a new database, and name it the SAME thing that you named your folder earlier.

Now go back to your Folder on your computer and find the file that is called wp-config-sample.php

and rename it to wp-config.php

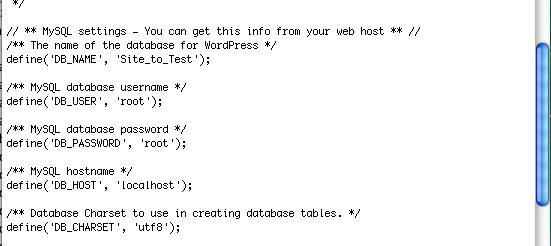
Now OPEN that file in Text Edit, and find this section.

Now, change 'database_name_here' to the folder name you have used (mine is Site_to_Test), then change 'username_here' and 'password_here' to 'root' This is how it should look now:
Now SAVE your file, and go to http://localhost:8888/FOLDER-NAME-HERE (change FOLDER-NAME-HERE to what you have named your folder), and you should see this!

**Note: MAMP is only a LOCAL server, so no one else can access your site on the net, you must purchase hosting in order to have your website up on the net, this is only good working on the design and testing.


No comments:
Post a Comment