


Step 1: Prepare your Slides
I designed this header in Adobe Photoshop (but any other program of your choice will work as well).

First, I am going to hide the Logo Layer.

Next, I am going to Save for Web.

Save you image slides as a JPEG with Maximum Quality selected.

Save them with the same name and just a different # on the end, I am doing mine like this: Slide1.jpg, Slide2.jpg, Slide3.jpg, and so on. Also, same them in the same folder.

After you have save all your slides like this (I am doing a total of 5, but you could do any number that you like), you need to hide everything BUT your Logo. **Make sure that your background is Transparent.

Now save your logo for Web, but make sure to save your Logo for Web, but instead of saving it as a JPEG, you MUST save it as a PNG with Transparency selected.

And Save.

Step 2: Build your Fading Slideshow in Flash
First off, I am using Flash CS3, so if you have a different version, I hope it works similarly, but I can't be sure.
1. The first thing you need to do is make a new Flash File (ActionScript 3.0)

2. Now you are going to want to change your document size to match the size of your slides.


3. After that, you are going to import your slides. Select File > Import to Stage...

4. Select your first slide and Import.


6. Next, you need to create as many layers as you have slides.

7. Then you need to drag each slide from Layer 1 to all the other layers, and you need drag the slides to the length that you prefer (I chose 50 frames, you can do what you like), and do a Right Click > Insert Keyframes at about 10 frames before the end of the slide. Do this for all of your slides.


8. Now take your slides and spread them out as seen below.


9. Next, Select the end of the first slide, and drag it to the end of the entire slideshow.


10. Next you need to make do a Insert Keyframe on the bottom slide to match the last Keyframe.

11. Then Select all of the frames from where you just drug the slide all the way to the new keyframe you did and Right Click > Clear Frames.

12. Now you need to take the last slide and shorten the end keyframe to about half on the top and bottom slide.


13. Now you need to add another Layer and Import your logo slide above the other Slides.


14. Drag your logo slide out so that it goes exactly to the end of the entire slideshow.

15. Now you need to go to the First Slide and put the Red Playhead over the short Keyframe on the Second slide as shown below. Then click on the actual slide (the image) and Right Click > Convert to Symbol

16. Then this box will come up and you need to select Graphic and OK.

17. Then at the bottom in your Properties box, change the Color to Alpha.

18. And leave the % at 0%.

19. Now you are going to click anywhere in the short keyframe on the second slide and Right Click > Create Motion Tween.

20. Now you need to repeat Steps 15 - 19 on the rest of the short Keyframes (just the top ones). Do the last one the same EXCEPT (important) instead of leaving the Alpha as 0%, change it to 100%.

21. Do the same thing on the last one and Creat Motion Tween.

22. Now test your slideshow by clicking File > Publish Preview > Default - (HTML)

23. If you are happy with it, you are ready to Export it. Click File > Export > Export Movie...

24. The only thing I change when I save it, is that I put the quality up at 100%.

Yay! Now you have your file ready.
Step 3: Hosting your Flash File
Now, I don't use Photobucket for my flash files (it CAN work....), I just don't like it because if you are using the free version (which most of my clients use), it compresses the files and it can be a pain to get it how you want it.
I use webs.com. I have my clients sign up for a free account under their name and have them give me a temporary password.
So once an account has been set up, you need to login, and Click on Site Settings on the top tab bar.

Then you need to scroll down to the bottom, and on a sidebar on the right hand side (Other Settings), you need to click on Downgrade Account to HTML.

Then on your Site Manager screen, click on Single File Uploader, and upload your swf file there.


Now Copy and Paste the web url somewhere for safe keeping for the next Step :)
Step 4: Put your Flash Slideshow on your Blogger Blog
You can't just upload a swf file to your header (I wish you could), so here is my way around this.
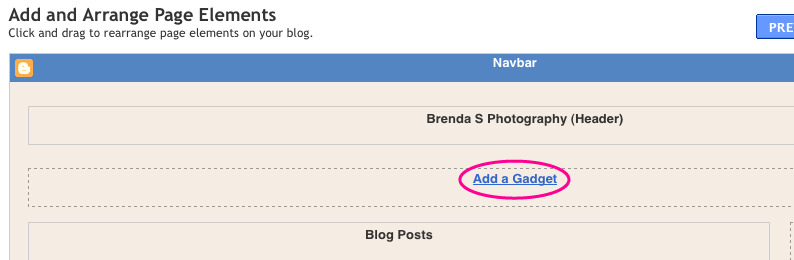
Add an HTML Gadget right under your Header.\
Paste this code in your gadget and put the URL for you swf file where indicated (also don't forget to enter in the width and height of your Header):
<embed src="Put Your swf File Here" width="XXXpx" height="XXXpx" /></embed>
Now it looks something like this....

But I am sure that you don't want the Title of the blog to show, so what you need to do now is to go to your good old Edit HTML Page and add this line...
display:none;
...in these 2 places as shown below.

Now go view your blog!

Oh, and Thank You Brenda for allowing me to use your work for this tutorial!


Hi!
ReplyDeleteI have one problem, otherwise it's All good.
When i have done everything just like your text+pictures, INCLUDING the last slide that I put to 100% alpha instead of 0%, it still doesn't work..
It jumps from the last to the first as it should (loop the whole shit) but it DOESN'T CROSSFADE between there, and I have put out the Motion Tween and the first slide is in the end by the last slide picture.
So everything is fine until the crossfade-effect between the last and first picture (slide) appears to be failing..
Please help me as soon as possible!
Tutorial was great otherwise!
Cheers mate!
/Filip
Hi! Great tutorial! I did just like this. But now the thing is , I would like it if I click on that flash to take me to home page. How can I do that?
ReplyDeleteYou can see it here: http://ellacino.blogspot.com/
MISSION: PROVIDE ASSISTANCE GRANT FOR OVERCOMING THE WORLD SOCIAL WELFARE.
ReplyDeleteVISION: SCHOLARSHIP ASSISTANCE, WELFARE SOCIETY, THE PROMOTION ORGANISATION & CAPITAL COMPANY
http://www.okeynotes.com/group/106