Hopefully with this simple tutorial, I can get you hooked on seamless patterns as backgrounds. Not only are they simple to make, and oh so lovely, the go on forever and ever, no nasty white space. Oh, and don't let me forget, they are smaller in file size, therefore, they will show up quicker when you are loading your page.
So on to the tutorial! This is going to be the first of 2 tutorials, and this one is the UBER EASY way to do it. We are going to take a dingbat font (this is "Davys" that I found at fontsquirrel.com) and make that into our seamless pattern.
First, go to Type and Glyphs.
Then find your font, and find a dingbat that you like, for the way that we are going to make this seamless pattern, a semi square font usually works the best, but just experiment with it :) This is the one I chose:
Now go ahead and change your font to Outlines, by doing a Right-Click and Create Outlines.
Now I need to make a box with my Rectangle Tool. When you drag your mouse to make the box, if you hold the Shift key, it will stay exactly square. My box has no Stroke or Fill Color.
Then you need go Window and Align, to get your Align box.
Now select both your box, and your Dingbat and click on the Horizontal Align Center. That will Align your box and your dingbat exactly center.
Then you need to click on the Vertical Align Center. That will make it all centered now. Now if you need to resize your box any (it should be slightly larger than your dingbat, as shown below), then use the corner to size while you hold down the SHIFT and ALT. That will keep your box centered on the dingbat.
Now, select both the box and the Dingbat, and Drag it onto your Swatches Palette. Then it will show up like this:
Now, make a box, and use the new swatch you make to preview your seamless pattern.
Now of course I CAN'T just leave this black and white, so I am going to go back to the box and the dingbat that I made, and change the box pink, and the dingbat a darker pink, then just drag it on to the Swatches Palette, just like I did before, and Voila! Now it is cuter :)
Now if you want to use this as a blog background.... You need to save it like this:
First you are going to go back to the box and the dingbat that you dragged on to your layer palette, and you are going to find out what size your box is, by clicking on it, and using your Info palette. (if you don't know where your info palette is, go to Window, and Info).
Mine is 156px X 156px, so I am going to make a new document that is just that, 156 X 156. Then I am going to copy and paste it onto the new document and put it exactly centered, like so:
Then, just to make sure that I don't have any sliver of white around my box, I am going to take just the pink box that is behind the dingbat, and I am going to size it up, by holding the corner and holding shift and alt. Then it will look like this on your document:
Now I am going to do a File, Save for Web, and save it as a PNG.
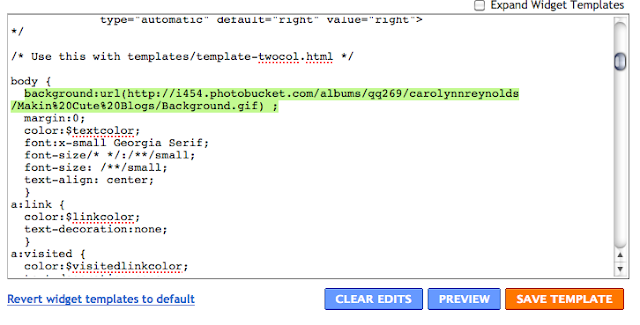
Now just upload it to Photobucket and go to your "Edit Html" page in blogger. Paste this code where I have shown below:
background:url(your "direct link" code here) ;

Now you have a nice seamless pattern background, and NO nasty white space, even on a 30 inch monitor :)


Great explanation. Don't you just love Illustrator?!
ReplyDelete